How To Setup GoDaddy Custom Domain On Blogger Blog [Latest 2021]
Have you buyed a domain name for your blog/website ? If no, then what are you waiting for. In 2020, it has become very necessary to buy a domain name for blogger blog. A paid domain name not only gives your site URL a great look but also helps in SEO & ranking of your blogger blog.
If you don't know how to buy a domain name [eg.:- xxxx.com or xxxx.in , etc.] for your blogger blog, read this article on :- How To Buy A Domain From GoDaddy
If you know how to buy a domain name for your blogger blog and have already buyed one and want to know what to do after it,i.e., how to connect GoDaddy domain to blogger, then here you are going to know all about it in a detailed step-by-step manner.
Why GoDaddy ?
GoDaddy is a well-known Domain Registrar company. It is frequently coming up with great offers and discounts on domains and web-hostings. Many top-level domains like .com , .in , .xyz , etc. are available at prices like Rs.199/First Year , Rs.149/First Year and Rs.99/year respectively. So, if you want to buy cheap domain for your blogger blog , then GoDaddy is the best place for you.
Step-By-Step Setting Up GoDaddy Domain On Your Blogger Blog :- [For New Blogger Interface]
1.) Go to GoDaddy website and login into your GoDaddy account from which you have buyed the domain.
2.) Go To 'My Products'.
3.) Under 'Domains' , click on the DNS in front of the domain which you want to connect to your blogger blog.
4.) Keep this tab open and then open a new tab and go to Blogger.com and sign into your blogger account in which your blog is created.
5.) If you have created more than one blogs from same blogger account , then firstly choose your blog to which you want to connect the domain.
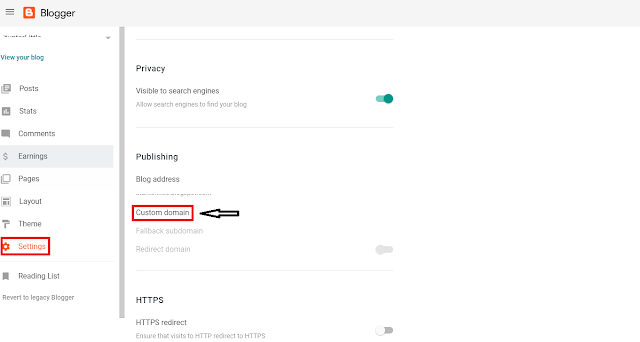
6.) Now navigate to Settings > Publishing .
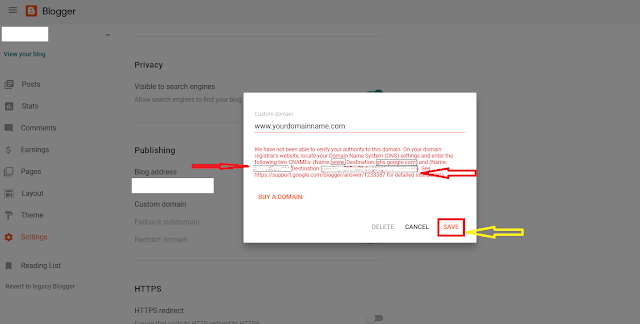
8.) Now enter the domain you have buyed along with www. in the prefix of your domain name and click on Save.
9.) Now after clicking on Save, you will see some error like this ''We have not been able to verify your authority to this domain......''.
10.) Keeping this tab opened, navigate to the GoDaddy DNS Management tab (which we left opened).
12.) Click on Add. Select CNAME from Type . Enter '@' in Host. Enter 'ghs.google.com' in Points To. Then click on Save.
13.) Now add another CNAME by clicking on Add.
14.) Now go to the opened blogger tab and from the error shown copy Name and Destination and paste them in the Host and Points To box in the opened GoDaddy DNS Management tab and then click on Save.
15.) Now you will have to add four 'A' Records with '@' in the Host and Points to:-
216.239.32.21
216.239.34.21
216.239.36.21
216.239.38.21
these four IP Addresses.
16.) Now you are all done with setting up Records. [It may take 5 minutes or upto 24 hours for these changes to take place.]
17.) Now once again go to the opened Blogger tab and click on Save button again.
If you are getting the ERROR again means the changes have not been fully done. Wait for 1 - 2 hours more or maximum 24 hours (very rare), then you will definitely be able to Save your Custom Domain in your blogger blog.
But here we are not done setting up our domain completely , one last thing is remaining .
Under Custom Domain 'Turn On' Redirect domain , so that if someone enters your domain in the browser without www. in the beginning, he gets automatically redirected to www. version of your domain name without getting any ERROR.
Also 'Turn On' HTTPS availability and HTTPS redirect , so that HTTP gets redirected to HTTPS.
If you face any problem in any of the steps, then feel free to Comment it in the Comments Section and do share this post on Facebook, Twitter, WhatsApp, Google Plus and other social media platforms.
![How To Setup GoDaddy Custom Domain On Blogger Blog [Latest 2020] How To Setup GoDaddy Custom Domain On Blogger Blog [Latest 2020]](https://blogger.googleusercontent.com/img/b/R29vZ2xl/AVvXsEiKhEasgpQcXezDIzZPGIT1kKIQb4cukFvUojTchmyfIoCRkErYUlVhmEF-4r4b5wiYNNEanPROabb02ibCgFc1TW8C3AE43GSxj6vb6oCDqxOieBuVWVBMSGZ9Wrnd_YBKxJq3dPpipI8/w640-h360/How+To+Connect+GoDaddy+Domain+To+Blogspot.png)


No comments: